Wednesday, April 25, 2012

Flax & Sesame Crackers

Here is a great recipe I came up with when trying to figure out what to do with juicer pulp! Very easy to make and extremely nutritious. This gluten-free, vegan, cracker is perfect for snacking on and is also highly anti-inflammatory.

Nutritional Content:  These crackers are a good source of dietary fiber, thiamin, magnesium, phosphorus, copper, manganese and a great source of omega-3 oils. There are 144 calories per serving (4 crackers).

½ cup ground flax-seed meal 
1 cup carrot juicer pulp (optional)
¾ cup filtered water (reduce amount slightly if not using carrot pulp)
3 tablespoons toasted sesame seeds
¾ teaspoon salt
Coconut oil for greasing (or olive oil) 

Makes 20 crackers

Notes about the ingredients: Flax seed meal can be found at health food stores and some supermarkets (I use Bob's Red Mill brand). If you cannot find it ground, you can do this yourself using a food processor or Stone mortar and pestle. Carrot pulp can actually be substituted with any vegetable juicer pulp, bearing in mind the flavor will change, carrot gives this cracker a slightly sweet edge.

Pre-heat the oven to 300°F. In a bowl, combine the flax seed meal, carrot pulp, water, sesame and salt together to form a sticky dough, mix well. Lightly grease a baking sheet with the coconut oil, then spread the dough out, making sure it is level, the thickness I use is about 3-4mm, any thicker it may need longer in the oven. Before baking, score out 20 cracker squares with a knife so it's easier to break. Bake for 25 minutes. Let dry out for 1 hour in the oven, heat turned off. Enjoy with hummus, guacamole or a selection of cheeses.
 

Tuesday, April 24, 2012

Chicken Liver Pâté with Thyme


Although organ meats are not so common in modern cuisine; they are  highly valued for their nutrition and unique taste. Matt and I eat organ meat occasionally as a great source of protein, vitamins, minerals and essential fatty acids. This pâté will mature and sweeten the longer it rests, I prefer the taste 3 days after making, use sparingly as it is high in cholesterol. This recipe is a slightly adapted version of Food Network’s Terrine De Foies de Volaille.

Nutritional Content: Per serving (44g) there are 110 calories. Although very high in cholesterol, the spread is a great source of protein, iron, selenium, multiple B vitamins (including B6 and B12) and  a source of zinc and copper.

220 grams free range organic chicken livers, cleaned well
½ cup of milk (or your choice of dairy free milk)
2 fresh shitake or chestnut mushrooms finely diced
4 tablespoons of organic ghee (clarified butter)
½ cup of chopped shallots
1 teaspoons minced garlic
1 tablespoon green peppercorns, drained (if using dried peppercorns soak in water for 30 minutes first)
3 bay leaves
¾ teaspoon chopped fresh thyme
¼ teaspoon sea salt
2 tablespoons Congac or Brandy
Freshly chopped parsley for garnish


Notes about the ingredients:  Free Range organic chicken livers are lower in cholesterol and do not have the toxins which accumulate in conventionally raised chickens fed with growth hormones. They are extremely nutritious. Learn more here. Ghee is virtually lactose and casein free due to the milk solids being removed, see how to make ghee at home.


In a bowl, soak the livers in the milk for 2 hour with the bay leaves. Drain well when ready, saving the bay leaves. In a large frying pan, melt 2 tablespoons of ghee over medium-high heat, add the shallots and cook until soft for about 5 minutes. Add garlic, chicken livers, diced mushrooms,  half of the peppercorns, the bay leaves, salt and pepper. Cook, stirring until the livers are well browned on the outside and still pinkish and tender on the inside. Add the Cognac or Brandy and cook until most of the liquid evaporates, making sure the livers are still tender. Remove from the heat and let cool, discard the bay leaves. Puree the mix in a food processor whilst adding the remaining ghee. Adjust seasoning to taste and process well. Pack the pâté into ramekins, small pots or tins and refrigerate for at least 12 hours. Serve with bread, gluten free crackers or corn chips. 

Sunday, April 22, 2012

Homemade Tomato Marinara Sauce


This is a very simple recipe for a classic Italian tomato sauce. The key is in the quality of the tomatoes and the slow cook method, brings out the natural sweetness of the onions and tomatoes. No need for added sugar. Use this for all tomato pasta dishes and pizza. It beats canned Italian sauces any day. This can take up to 2 and a half hours to prepare so make in advance and use throughout the week.

Nutritional content: This recipe has a low glycemic load however tomatoes aren’t anti-inflammatory so I currently minimise the amount of dishes with tomatoes. It is low in cholesterol, a good source in Vitamin A and a very good source of vitamin C. Approximately 155 calories per portion.
 
8 medium to large fresh tomatoes
2 cloves garlic, minced
1 medium onion, finely chopped
1 ½ tablespoons of olive oil
1 tablespoon mixed Italian dried herbs (oregano, parsley, thyme etc.)
1 teaspoon salt
Salt and black pepper to taste
 (makes about 5 portions)
 

Preparing Fresh Tomatoes
The tomatoes will need to be de-skinned and de-seeded before cooking. The easiest way to do this is to core the tomatoes and heat shock them. To do this cut a cross at the base of each tomato before soaking them in cold water. Prepare a boiling pot of water, pick out the cold tomatoes and drop them into the boiling pot, within 30 seconds you should see their skins loosen. Remove them from the hot water and hand peel the tomatoes. Separate the seeds and reserve them in a separate bowl. Once the tomatoes are chopped, press the juice of the discarded seeded parts with  a sieve and add the juice to chopped tomatoes.

For the Sauce
To make the sauce, heat a large pan over medium–low heat and slowly cook the chopped onions in the olive oil. Stir occasionally and cook until starting to brown, this will take about 10 to 15 minutes. When ready, add the chopped tomatoes, juice and crushed garlic to the pan. Increase the heat to medium for a few minutes, once starting to simmer set the heat to low. Add the salt and dried herbs and let simmer for 2 hours stirring occasionally. If you would like to use fresh herbs add them near the end. Season to taste.

Saturday, April 21, 2012

Choco-Beet Cupcakes


A month ago Matt and I started on an anti-inflammatory diet in the hope we’d be able to relieve his CFS symptoms nutritionally. The diet eliminates refined sugars of all kind. Much of the sugar’s we’ve been consuming come from root vegetables and fruit alone. I’ve decided to pick up the mixing bowl for the first time with this sugar restriction... what I came up with is a deliciously moist, healthy, gluten-free, lactose and casein-free, sugar-free recipe for chocolate cup cakes.

Nutritional content: Approx 130 calories per cupcake (with icing), they are good source of Vitamin A and very good source of anti-oxidant, Manganese with only 3 grams of sugar per cake.

For the Cake
6 tablespoons brown rice flour
1 tablespoon potato starch
1 tablespoon gluttonous rice flour (sweet rice)
1 teaspoon xanthium gum (optional, provides a better texture)
2 tablespoons of cocoa powder (unsweetened)
1 teaspoon aluminum free baking powder
1 teaspoon apple cider vinegar (or white vinegar)
1 teaspoon bicarbonate of soda (baking soda)
2 tablespoons organic ghee (clarified butter)
1½ tablespoon of walnut oil
1½ teaspoon of vanilla extract
2 tablespoons agave nectar (or honey)
10 drops liquid stevia
2 free range eggs
½ cup raw beets (finely grated or food processed)
½ cup of raw finely grated carrot (1 medium carrot)
¾ cup filtered water (or as needed)

Vegan Chocolate Icing
¾ cups of soy powder (available in natural/organic food stores)
2 tablespoons of cocoa powder (unsweetened)
2 tablespoons of coconut oil (or vegetable spread)
5 drops of stevia
1 tablespoon agave nectar
2 drops vanilla extract
Water as needed
A small handful of raw cocoa nibs to decorate (optional)

Notes about the ingredients: I use organic ingredients where possible. I feel this is a necessity for ghee and eggs as organic free range produce has better nutritional content  (i.e more omega-3 oils). Ghee is virtually lactose and casein free due to the milk solids being removed from the butter. It is a great alternative to butter for those with dairy allergies, if you cannot find ghee it is easy to make. The beets and carrots are required to provide sweetness and more importantly, structure in the cake where sugar is not present. Agave is a low glycemic index alternative fructose sweetener and is a common raw vegan substitute for sugar and honey. Stevia is a herb with very sweet tasting leaves. It's a natural, calorie-free sweetener which can be purchased in powdered or liquid form, we prefer the liquid in this kitchen!

Pre-heat the oven to 350°F, and ready the muffin tin with cupcake cases. Start by mixing the ghee and oil until well blended.  Stir in the stevia drops, agave and vanilla extract. Sift in the cocoa powder, add the processed beets, carrots, eggs and mix very well. Next, sift in the flours including the baking powder (reserve the baking soda for later). After combining, add the water slowly to create a more fluid batter. Lastly, in a separate bowl, pour the apple cider vinegar with the baking soda so that it fizzes up. Carefully fold this into the cake mix making sure not to stir too much. When ready, spoon the batter into the baking tin. Bake for 12 to 14 minutes. Leave out on wire racks to cool.


For the icing, mix the coconut oil well until smooth, add the vanilla extract, stevia and sifted cocoa powder mix in the soy powder and slowly add water until a desired consistency is reached. Use when cakes have cooled and finish with cocoa nibs.


Thursday, February 23, 2012

Halo Halo

For those unfamiliar with the dish, Halo Halo is an extremely delicious refreshing filipino dessert which is much loved, especially on a hot and humid day. There are so many variations to this recipe that every halo halo experience is difference. However a few standard flavours and textures are always present in this dessert: crushed ice, evaporated milk, ube, beans, fruit, coconut and ice cream. Here's my late night sundae style variation, serves 2.

1 cup crushed ice
½ cup ube jam (see my Ube Jam post)
2 scoops mango ice cream (this can be difficult to find as most places sell mango sorbet, Haagen-Dazs does a very good one if you can get your hands on it)
⅔ cup jackfruit slices (canned jackfruit, drained and sliced)
2 tablespoons of macapuno slices (young coconut flesh, this can be bought in jars)
2 teaspoons of aduki beans (ready to eat, you may also use unflavoured kidney beans)
½ cup of  agar agar jelly peices (I used a great recipe I found here which I cubed, this is optional)
2 tablespoons of evaporated milk

Prepare two sundae style glasses or small bowls. Spoon a layer of ube jam, followed by beans and macapuno in each glass. Cover entirely with a layer of ice and repeat, adding in jackfruit too. Cover this with ice once again and continue assembling the two glasses until full making sure the top level is ice. Spoon the evaporated milk on top. Now add the scoop of mango ice cream the rest of the jackfruit, macapuno and agar agar cubes.


Ube Jam (Purple Sweet Potato)

I was excited to find frozen packs of grated ube (purple sweet potato/yam) in the asian store recently. I immediately thought of Ube ice-cream and the ultimate icy filipino dessert Halo Halo. It's a unique flavor of eastern Asia you cant seem to find readily in the west. After some searching online I came across a recipe for Ube Jam on Filipino Foods Recipe . This jam seems pretty versatile, so I decided to make a ½ batch with Halo Halo in mind.

500g  ube (purple yam)
½ can of evaporated milk
½ can of sweetened condensed milk
¼ cup of butter or margarine
1 drop of vanilla extract (optional)

Firstly, boil the ube (unpeeled) in water for approximately 30 minutes, drain and cool. Peel the yam and finely grate. In a large pan on medium heat, melt the butter, sweetened condensed milk and vanilla extract. Add the grated ube yam and turn the heat down to low. Keep on mixing the ingredients for about 30 minutes or until sticky and a bit dry (but still moist) This can be tiresome to do but it is necessary to ensure a good consistency. The flavour and colour will deepen as it cooks. Add the evaporated milk and continue to mix for another 15 minutes. Let cool  by placing the jam on a large platter.

I separated the mixture into 3 batches and saved a couple in the freezer. Ideas for ube jam: use in cake batter to make a light ube flavored lilac cake, mix with cream and sugar to make homemade ube ice cream. Add confectioners sugar to the mix to create ube icing, a spoonful of ube jam blended with coconut water for a great bubble tea! base!


Sunday, February 12, 2012

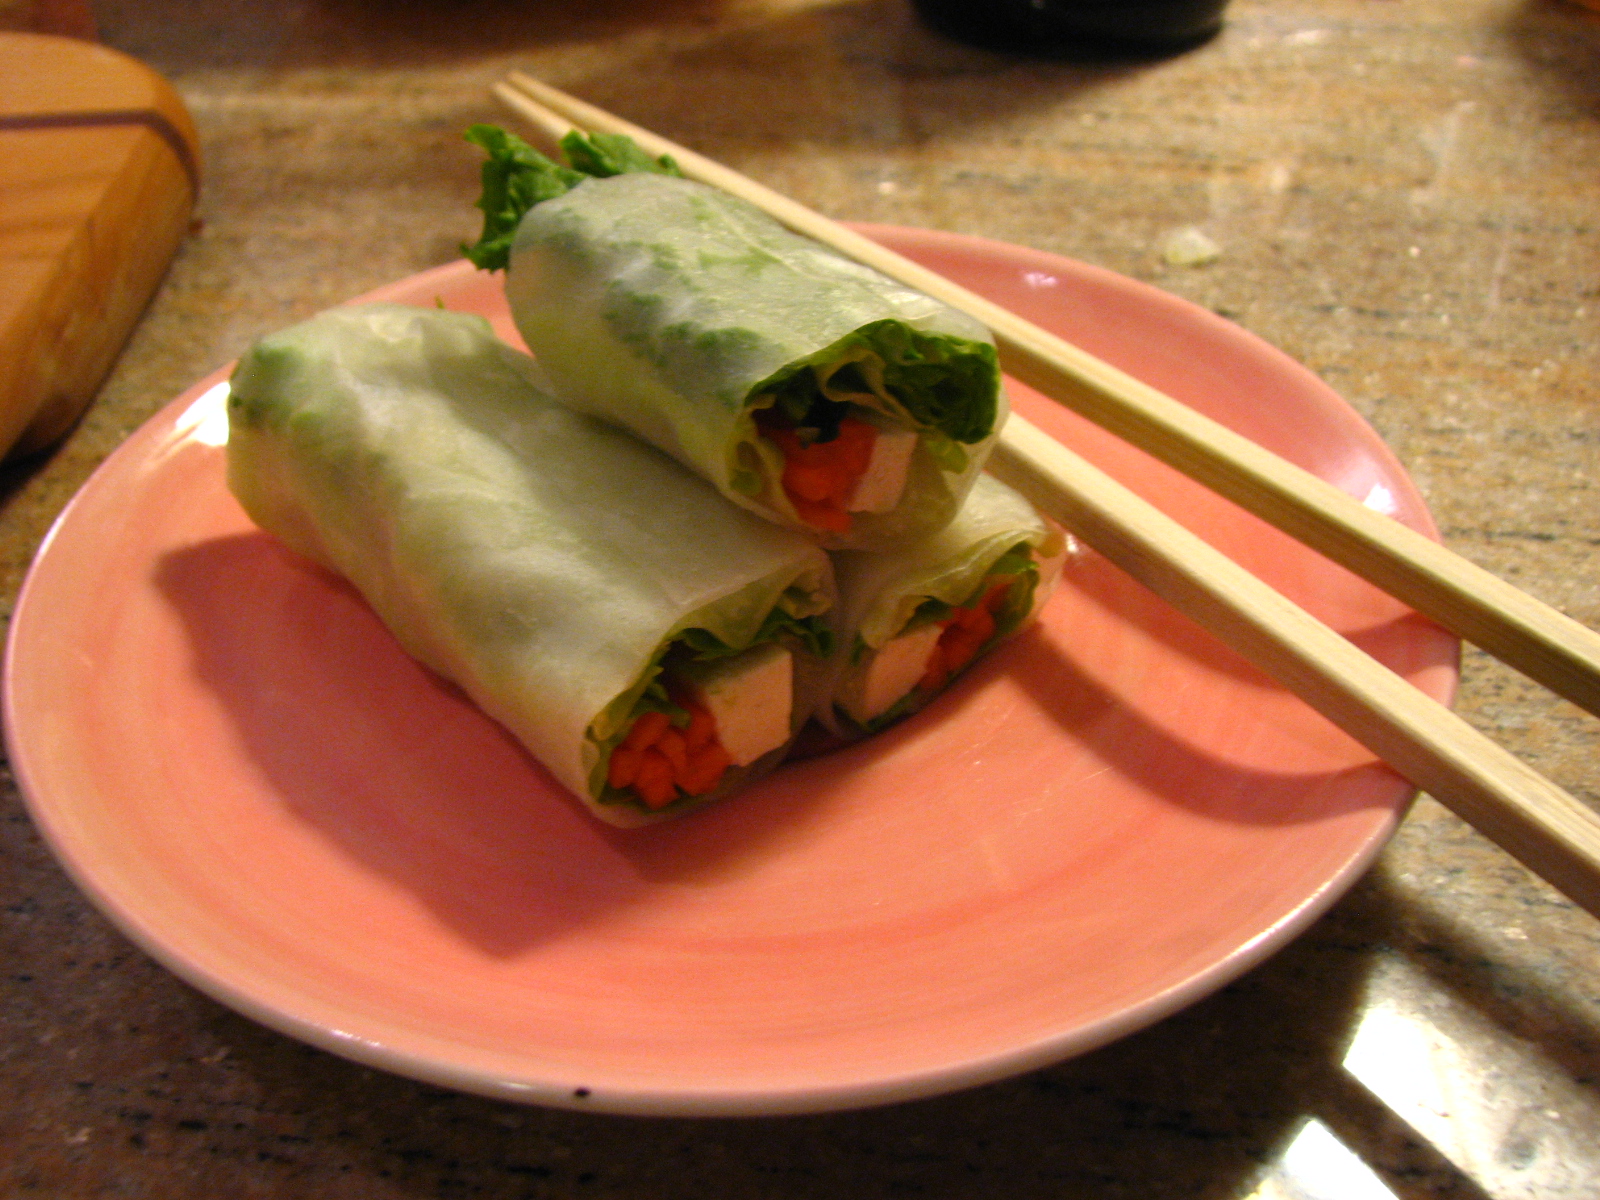
Vietnamese Fresh Spring Rolls

These are healthy gluten free, vegan and very easy to make. Whenever we end up in a Vietnamese or Thai restaurant we never fail to order these. I think the key ingredient for authenticity is thai basil leaves. I've omitted the vermicelli rice noodles in this version. The dried rice paper sheets can be found in asian supermarkets.


For the spring rolls:
1 pack of dried rice paper sheets
2 handfuls of lettuce leaves (Romaine is recommended for it's crunch)
3 medium sized carrots, sliced thin, julienne-style
120g of firm Tofu, sliced into ¼ inch thick strips
1 small bunch of thai basil


Prepare the filling ingredients ahead of time and set to one side of the work area. Make sure there is a clean surface, ideally a large chopping board, to roll the spring rolls. Pour some hot water (not boiling) into a large mixing bowl or container large enough to soak the rice paper. Gently soak the rice paper one at a time, it may take between 5 seconds and 15 seconds to soften completely but make sure the paper is no longer stiff.

Take the softened rice paper and carefully lay out on work surface. Place lettuce, tofu, carrots and thai basil  down the middle of the paper. carefully wrap the rice paper and roll tightly to finish the roll. Please note that the rice paper is fragile and will end up breaking if the wrap is forced too tightly, however it is necessary to have some level of tightness otherwise it will come apart.

Repeat this until the filling is used up and save the leftover rice paper. Cut each roll with a sharp knife into three sections. This make approximately 8 rolls. Serve these with either sweet chilli sauce or Peanut dipping sauce.

For the peanut dipping sauce:
1 inch of fresh ginger, grated
3 tablespoons of crunchy peanut butter
1 tablespoon of gluten free soy sauce
1 tablespoon of water
1 teaspoon of honey
1 teaspoon of rice wine vinegar
3 cloves, finely ground

Combine all the ingredients above to create the sauce, it's similar to satay and works well with fresh spring rolls.


Home made sweet chilli sauce:
 Juice of 1 lime
¼ rice wine vinegar
2 tablespoons of white sugar
2 tablespoons of fish sauce
2 cloves of garlic, minced
1 to 2 teaspoons of very finely diced red chilli or chilli paste (adjust to taste)
1 teaspoon of finely chopped fresh corriander (optional)

Mix all ingredients well until sugar has fully dissolved and serve.